

3 Milk Science Experiments Teachers Can Run With Low Mess and Prompts
Try three milk science experiments right now: Magic Milk for surface tension, ice cream in a bag for freezing-point depression, and casein plastic for protein curdling. Magic Milk needs just milk, food coloring, and dish soap, with an adult nearby for cleanup. The ice cream bag needs ice and rock salt. The casein plastic needs a stovetop and adult supervision for the hot milk step.
TL;DR:
- Magic Milk reveals surface tension effects with milk fat reacting to dish soap, especially prominent in whole milk due to higher fat globules.
- Ice cream in a bag leverages salt’s lowering of ice’s melting point, enabling rapid freezing of milk-based mixtures within 10 minutes.
- Casein plastic forms from heated milk and vinegar, creating a moldable material that hardens over one to two days, illustrating protein curdling and polymer formation.
- Using different milk types or dairy alternatives can affect experiment outcomes, highlighting the roles of fat, proteins, and lactose in milk’s behavior.
- Temperature plays a critical role, with heat needed to curdle proteins in plastic activity and cold for freezing in the ice cream experiment.
Table of Contents
- Which Milk Science Experiment Should You Try First?
- How Does the Magic Milk Experiment Work?
- How Do You Make Ice Cream in a Bag?
- How Do You Turn Milk Into Plastic?
- Turn These Demos Into Real Experiments
- Why Milk Fat Isn’t the Whole Story
- What Happens When Milk Spoils or Ferments?
- How Do You Measure or Track Milk Experiment Results?
- How Does Temperature Change Milk’s Chemistry?
- What Does Milk Look Like at the Molecular Level?
- Why We Think Kids Remember Science Better With a Story Attached
- Give Kids More Chemistry They’ll Actually Want To Read
- Where to Learn More About Milk Chemistry
- Sources
Which Milk Science Experiment Should You Try First?
Pick based on how much time you have and how much mess you can tolerate. All three use milk from the fridge, but they teach completely different branches of chemistry.
- Magic Milk: whole milk, food coloring, dish soap, shallow dish. Takes 5 minutes. Ages 4 and up. Teaches surface tension and fat interaction. Almost no mess, no heat.
- Ice cream in a bag: milk or half-and-half, sugar, vanilla, ice, rock salt, two zip-top bags. Takes 10 to 15 minutes of shaking. Ages 6 and up. Teaches freezing-point depression. Low mess, but cold hands need gloves or a towel.
- Casein plastic: milk, white vinegar, stove or microwave, strainer. Takes 20 minutes active plus a day or two of drying. Ages 8 and up, adult required for the heating step. Teaches protein chemistry and polymer formation. Moderate mess, involves hot liquid.
Every one of these fits under the broader umbrella of states of matter activities since milk itself shifts between liquid, semi-solid curds, and (in the freezer version) something close to solid. Full instructions for each are below, including the science explanation you’ll actually want when your child asks “but why does it do that?”
How Does the Magic Milk Experiment Work?
Pour whole milk into a shallow dish or pie plate, about a quarter inch deep, and let it settle for a minute so it’s still. Add three or four drops of different food colors near the center, not touching each other. Dip a cotton swab in dish soap, then touch it lightly to one of the color drops. Do not stir. Watch the colors burst outward and swirl for 20 to 30 seconds, then add soap to a second color and repeat.
- Pour milk into a shallow dish, roughly a quarter inch deep.
- Add drops of food coloring in a loose circle, leaving space between colors.
- Dip a swab in dish soap and touch it to one color drop without stirring.
- Observe the swirling for 20 to 30 seconds.
- Repeat with a fresh swab on a different color to reset the motion.
The chemistry: milk fat sits in tiny globules suspended in water, held together by surface tension. Dish soap molecules have one end that loves water and one end that loves fat, so when soap touches the milk, it races to surround those fat globules, breaking surface tension and dragging the food coloring along with it. The swirling stops once the soap has evenly coated the fat and the whole surface reaches a new equilibrium.
Whole milk gives the most dramatic, longest-lasting swirls because it has more fat globules for the soap to chase. Skim milk barely reacts. If you want a clean comparison for a science fair board, set up whole, 2%, and skim milk side by side and time how long the swirling lasts in each. Water as a fourth control dish, with no fat at all, should do almost nothing.
Pro Tip: Touch the soapy swab to the surface gently and resist the urge to stir. Stirring spreads the soap instantly and kills the localized swirl that makes this experiment worth watching.
Cleanup is just soapy water down the drain. No food coloring stains fabric permanently if you rinse fast, but cover the table anyway.
How Do You Make Ice Cream in a Bag?
This is the fastest way to turn a chemistry concept into dessert. Pour half a cup of milk (whole milk or half-and-half works best), a tablespoon of sugar, and a splash of vanilla into a small zip-top bag and seal it tightly, squeezing out excess air. Fill a larger zip-top bag halfway with ice, then pour in about a third of a cup of rock salt. Nest the small bag inside the large one, seal it, and shake for 8 to 10 minutes.
- Combine milk, sugar, and vanilla in a small sealed bag.
- Fill a large bag with ice and rock salt.
- Nest the small bag inside the large one and seal both.
- Shake continuously for 8 to 10 minutes, checking every few minutes.
- Feel through the bag for a soft-serve texture before opening.
You’ll know it’s ready when the small bag feels firm but still gives slightly, like soft-serve. If it’s still liquid after 10 minutes, add more salt and keep shaking.
- Wrap the outer bag in a towel or use gloves. Direct contact with ice and salt for several minutes can numb or sting skin.
- Rock salt, not table salt, works best because the coarser grains dissolve gradually.
- Use dairy-free milk alternatives for allergies, but expect a softer, less creamy result.
The science: salt doesn’t just make ice colder, it lowers the temperature at which ice can stay solid, forcing the ice to melt even below the usual freezing point. Melting requires energy, so the ice pulls heat from everything around it, including your milk mixture, fast enough to freeze it before it separates. It’s the same principle behind salting icy sidewalks, just running in reverse to make dessert instead of clearing a path. For a group activity, scale up with several small bags rather than one giant one, since the ice-to-milk ratio matters more than the total volume.
How Do You Turn Milk Into Plastic?
Heat one cup of milk on the stove or in the microwave until it’s hot but not boiling, then stir in four teaspoons of white vinegar. Curds should form almost immediately, clumping and separating from a thin, yellowish liquid called whey. Strain the curds through a coffee filter or cheesecloth, rinse gently with cool water, and knead the mass like dough for a minute or two.
- Heat one cup of milk until hot but not boiling. An adult should handle this step.
- Stir in four teaspoons of white vinegar and watch curds form within seconds.
- Strain the curds from the whey using a coffee filter or cloth.
- Rinse the curds briefly under cool water.
- Knead the curds into a smooth mass, then shape or mold it.
- Let it air dry for one to two days, turning occasionally so it hardens evenly.
The chemistry here is different from Magic Milk. Milk protein, mostly casein, normally floats in tiny stable clusters. Heat plus the acid in vinegar disrupts the electrical charge holding those clusters apart, so the proteins unfold and clump together into curds, essentially linking into a rough polymer chain as they dry. It’s the same basic reaction that curdles milk into cheese, just pushed further so the result hardens into something moldable instead of edible.
Pro Tip: If your curds come out slimy instead of clumping into solid pieces, add another teaspoon of vinegar and make sure the milk was fully hot before you added the acid the first time.
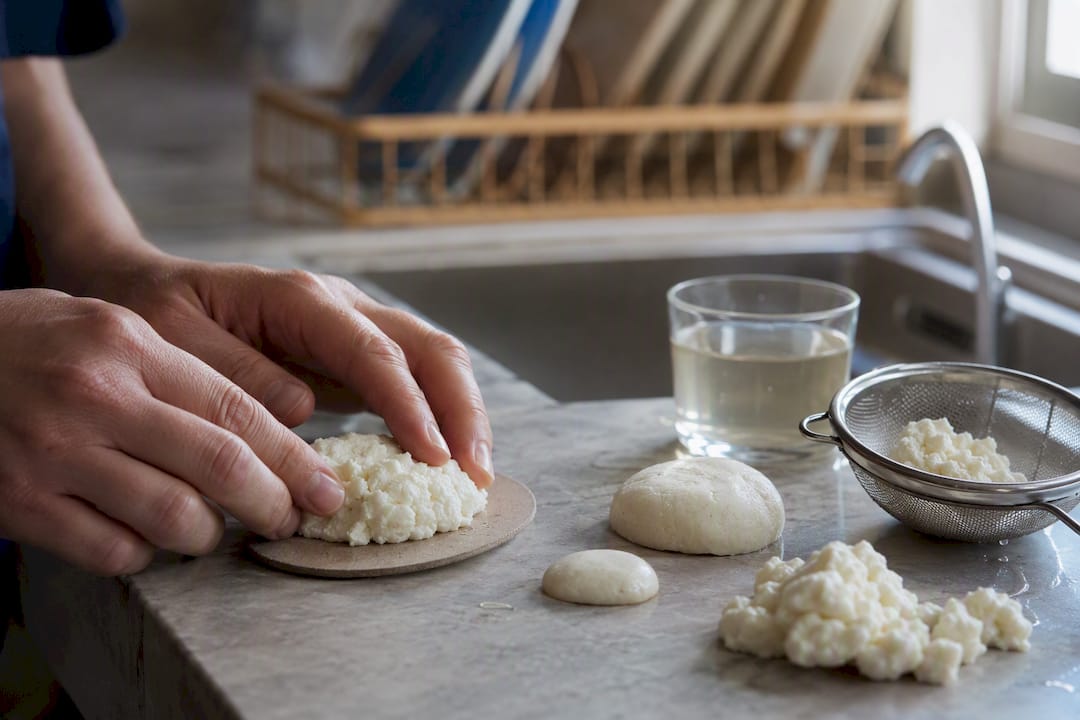
This activity has real history behind it: manufacturers made buttons and beads from casein plastic in the early 1900s, before petroleum plastics took over. Dried pieces can be painted or shellacked once fully hardened. Skip eating any of it. Once vinegar hits hot milk, you’re making a craft material, not a snack.
Turn These Demos Into Real Experiments
A demonstration shows kids something cool happens. An experiment asks them to predict what happens and check if they’re right, which is a small shift that changes everything about how much sticks.
- Before starting Magic Milk, ask: “What do you think happens if we use water instead of milk?” Then actually test it side by side.
- Frame one variable at a time. Compare whole milk versus skim, or dish soap versus hand soap, never both at once.
- Give kids a simple three-column sheet: prediction, observation, explanation.
- For casein plastic, have them measure how much whey drains off versus how much solid curd remains, and record it.
- Wrap up with claim, evidence, reasoning: what happened, what proves it, why it happened.
Educators recommend exactly this kind of predictive question to convert a five-minute demo into an actual investigation with a testable question and a real answer.
Why Milk Fat Isn’t the Whole Story
Fat gets most of the credit in Magic Milk explanations, and it deserves it, but milk is a more complicated liquid than that one ingredient suggests. Casein and whey proteins are suspended throughout, along with dissolved lactose, minerals, and vitamins, all floating in mostly water. That protein content is exactly why casein plastic works at all: without casein, heating and adding vinegar to plain fatty water would do nothing interesting.
Lactose plays a quieter role. It doesn’t drive the dramatic swirls in Magic Milk or the curd formation in the plastic experiment, but it does affect texture and how quickly milk spoils, which matters if you’re storing leftover milk between experiment sessions. Lactose is also the food source bacteria feed on during fermentation, which is a separate but related milk transformation worth exploring.
If you want to isolate variables cleanly, compare whole milk against a protein-fortified milk or a lactose-free milk in the casein plastic activity. Lactose-free milk still has the same casein content, so curds should form just as readily, which helps kids see that lactose isn’t the ingredient doing the curdling work. That’s a genuinely useful distinction, since a lot of home explanations blur fat, protein, and sugar together as if they’re interchangeable.
What Happens When Milk Spoils or Ferments?
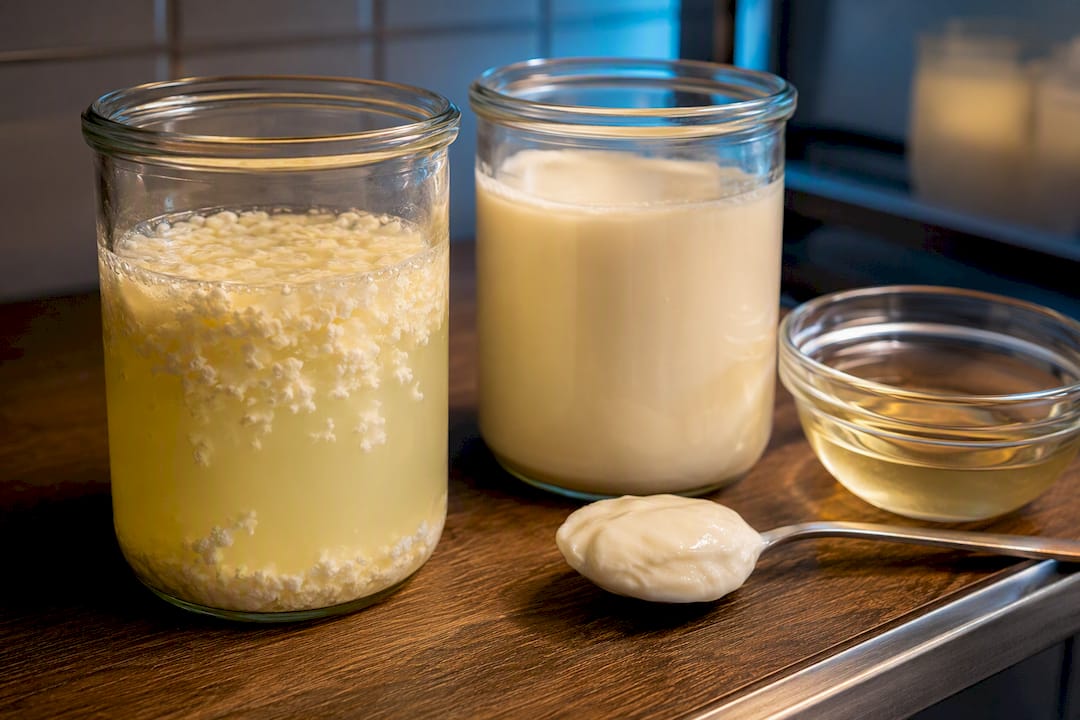
Spoiled milk and yogurt start from the same basic process: bacteria eating lactose and producing lactic acid as a byproduct. The difference is control. Spoilage happens when random, often unwanted bacteria multiply uncontrolled, producing sour smells, off flavors, and eventually unsafe byproducts. Fermentation happens when you deliberately introduce a specific bacterial culture, like the strains used in yogurt, and manage temperature and time so the process stays predictable.
That lactic acid buildup is the same acid mechanism behind casein plastic, just slower and biological instead of instant and chemical. Add a spoonful of plain yogurt to warm milk and let it sit covered at a steady 110°F for six to eight hours, and you’ll watch the same casein proteins clump into curds. The result is edible yogurt instead of craft plastic, because the acid concentration and temperature control are gentler.
This makes a great side-by-side teaching point: fast acid (vinegar) versus slow acid (bacteria) hitting the exact same protein. Both curdle casein. One takes seconds under heat, the other takes hours at body temperature. Never let kids taste anything from an uncontrolled spoilage experiment. Save tasting for a supervised, deliberately cultured batch made with a clean starter culture and food-safe handling.
How Do You Measure or Track Milk Experiment Results?
Eyeballing “it worked” is fine for a five-minute demo, but real measurement turns the same activity into data kids can graph or compare. A few simple techniques work without a lab:
- Timing swirl duration: use a stopwatch to see how many seconds Magic Milk keeps moving after soap touches the surface, then compare milk fat percentages.
- pH strips: cheap paper strips can track how acidic milk becomes as vinegar is added drop by drop, or how yogurt cultures shift pH over hours.
- Color intensity scoring: rate swirl spread on a 1 to 5 scale based on how far the color travels from the drop point, useful when a stopwatch feels too precise for younger kids.
- Curd mass: weigh dried casein plastic before and after drying to track water loss over the one to two day drying period.
None of this needs lab equipment. A kitchen scale, a $10 pack of pH strips, and a phone stopwatch cover almost every measurement a home or classroom setup needs.
How Does Temperature Change Milk’s Chemistry?
Temperature isn’t a side detail in these experiments, it’s often the actual trigger. Cold milk straight from the fridge works fine for Magic Milk because the fat stays solid enough to hold structure, but the swirl reaction happens at room temperature regardless of the milk’s starting point since it’s a surface interaction, not a heat-driven one.
Casein plastic is the opposite case entirely. Heat is doing real chemical work there, loosening the bonds that keep casein proteins stable in their normal folded shape, which is why the recipe insists on hot milk before adding vinegar. Try the same vinegar ratio with cold milk and curd formation slows dramatically or doesn’t happen cleanly, because the proteins haven’t been agitated enough to unfold and clump.
The ice cream bag experiment runs temperature in reverse, using the salt and ice combination to pull heat rapidly out of the milk mixture instead of adding it. Freezing is itself a temperature-driven state change, and it’s a useful moment to connect back to broader melting and freezing experiments and how temperature swings show up across totally different kitchen materials, not just milk.
What Does Milk Look Like at the Molecular Level?
Milk looks like a simple white liquid, but it’s closer to a suspension with several ingredients doing different jobs. Fat globules, each wrapped in a thin membrane, float throughout the water. Casein proteins clump into loose spherical structures called micelles, held apart by an electrical charge that keeps them from sticking together under normal conditions. Whey proteins dissolve more fully into the water itself. Lactose, the milk sugar, dissolves completely and doesn’t clump at all.
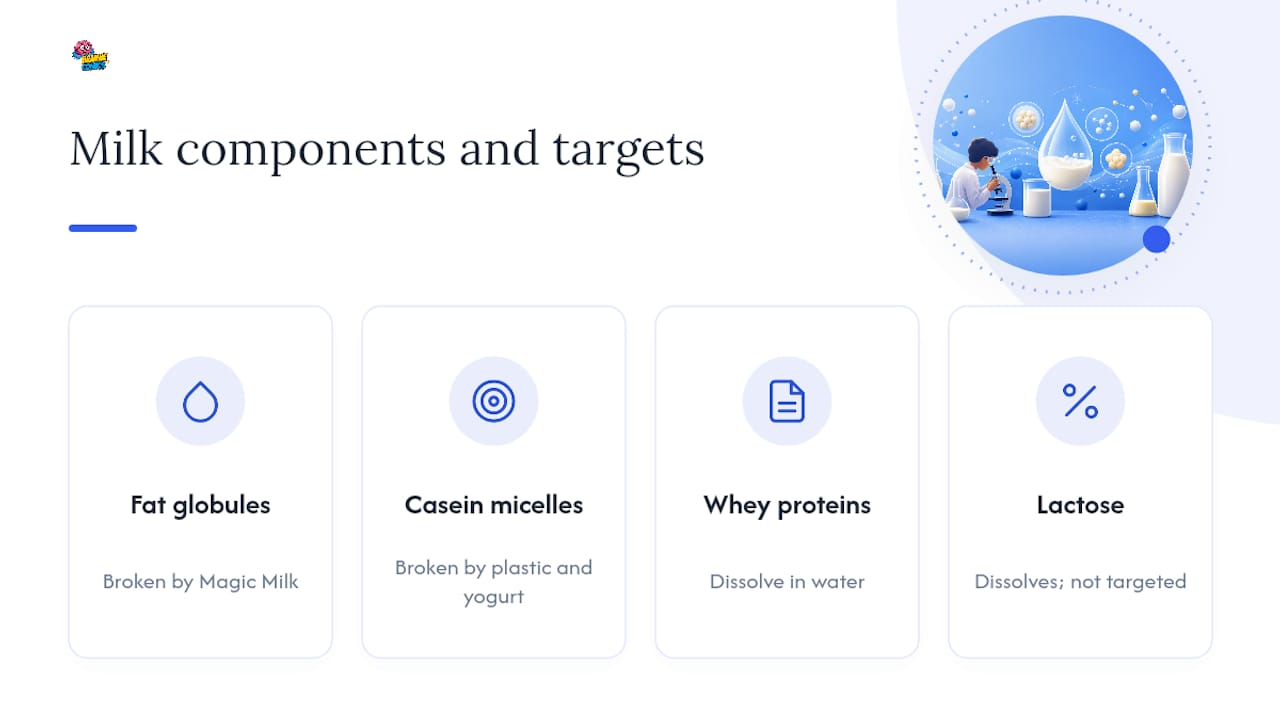
Every experiment in this guide targets one of those structures specifically. Magic Milk disrupts the fat globule membranes. Casein plastic breaks the electrical charge holding protein micelles apart. Yogurt does the same thing to casein, just slower and through bacterial acid instead of vinegar. None of them touch lactose directly, which is part of why lactose-free milk still curdles and still swirls, just as described earlier.
Understanding that milk is really four or five different ingredients suspended together, not one uniform liquid, explains why swapping milk types changes results so dramatically between experiments. It’s the same starting material behaving in completely different ways depending on which molecule you’re disturbing.
Why We Think Kids Remember Science Better With a Story Attached
We built our brand on the idea that a kid who’s curious about what happens next in a story will follow that curiosity straight into a real experiment, even one involving vinegar and hot milk. Watching a comic character puzzle through a chemistry problem gives the activity stakes a worksheet never will. Our chemistry and physics books both build kitchen experiments directly into the plot, so kids read a few pages, then go test the same idea on their own counter. Many parents report their kids reread the science pages after finishing an experiment, going back to check what the story got right.
— Brainie Comics
Give Kids More Chemistry They’ll Actually Want To Read
If Magic Milk and casein plastic got a reaction out of your kid, Fizz Force is built for exactly that moment. Unlike a standalone experiment sheet, it wraps chemistry concepts, including protein reactions and surface tension, into an ongoing comic story, with hands-on kitchen experiments and a completion certificate built into the book itself.

It’s designed for ages 7 to 12 and works equally well for a homeschool science block or a rainy Saturday afternoon. Pair it with Gravity Gang if physics interests your child as much as chemistry does, since both books follow the same story-plus-experiment format. Check current availability and order directly from Brainie Comics to get the next book in the hands of a kid who just discovered that milk can be pretty interesting stuff.
Where to Learn More About Milk Chemistry
- RSC Education: classroom-tested surface tension notes and safety guidance.
- Science Buddies: milk into plastic: full casein plastic protocol.
- Science Museum Group: Milk Magic: inquiry prompts for extending demos.
Sources
- Magic Milk Experiment For Kids (Colorful Kitchen Chemistry!)
- Investigating surface tension with milk | Class experiment | RSC Education
- Turn milk into plastic | STEM Activity
- Make a Milk Rainbow | STEM Activity
- Salt on ice (Scientific American)