

Parents & Teachers: Teach Paper Circuits in 30–60 Minutes with Comics
A paper circuit is a simple low-voltage circuit made with a coin cell battery, an LED, and copper tape stuck onto cardstock. Kids ages 5 to 12 can wire one in a typical class period or afternoon using just those three parts. No soldering iron, no wall outlet, no risk of shock. The reward is immediate: a card, a creature, or a poster that actually lights up because a child built the circuit with their own hands.
TL;DR:
- Using 3V coin cell batteries, copper tape, and LEDs, kids can build reliable paper circuits in about 30 to 60 minutes, suitable for classroom or home.
- Proper contact between copper tape and LED legs, correct polarity, and correct battery orientation are crucial to ensure the circuit lights up successfully.
- Troubleshooting often involves checking battery placement, tape connections, avoiding shorts, and wiring LEDs in parallel rather than series for multiple lights.
- Adding switches like foil pressure switches or pull-tab contacts can make circuits interactive, with safety precautions around small batteries and sharp tools.
- Encouraging children to predict circuit behavior and troubleshoot errors enhances understanding more than simply producing successful builds.
Table of Contents
- What Materials Do You Need for Paper Circuits Kids Can Actually Build?
- How Do You Build a Basic Paper Circuit Step by Step?
- Why Won’t My Paper Circuit Light Up?
- What Are Good Paper Circuit Project Ideas for Kids?
- How Do You Facilitate a Paper Circuit Session Safely?
- Which Batteries Work Best, and What Should You Watch For?
- Can You Add Switches or Sensors to a Paper Circuit?
- Where Can You Find Templates and Deeper Tutorials?
- Why Comics and Circuits Belong on the Same Table
- The Real Lesson Isn’t the Circuit, It’s the Debugging
- Sources
What Materials Do You Need for Paper Circuits Kids Can Actually Build?
The full parts list is short, which is exactly why this activity works so well for first-timers. You need a 3V CR2032 coin cell battery, one or more LEDs (5mm standard bulbs are easiest for small hands), and conductive copper tape, ideally 6mm or wider for beginners since narrower tape tears and misaligns more easily.
Copper tape sold specifically for electronics has conductive adhesive on the back, which matters more than most parents realize. If you’re shopping on a budget, hardware and garden stores sell nearly identical tape marketed as slug or snail repellent, and it works, but the adhesive is often non-conductive, so you’ll need to fold corners so the shiny metal sides touch rather than relying on the sticky side to carry current, according to SparkFun’s paper circuits guide. Conductive fabric tape is a workable substitute in a pinch, though it frays at the edges faster than copper.
Some kits push conductive paint or ink as an alternative. Skip it for kids under 10. The paint needs real drying time and turns into a mess on a shared table, while copper tape works the instant you press it down, based on SparkFun’s comparison of conductive materials.
Pro Tip: Buy CR2032 batteries in bulk 10-packs. Kids drain them fast through trial and error, and a dead battery is the single most common reason a “broken” circuit is actually fine.
Here’s a realistic shopping list for a group session:
- CR2032 coin cell batteries, one per child plus spares
- Copper foil tape, 6mm width, one 15 to 30 foot roll per 4 to 6 kids
- 5mm LEDs in assorted colors, 2 to 3 per child
- Cardstock or folded card templates (blank or printable)
- Clear tape and binder clips for battery holders
- Pencils for tracing circuit paths before taping
A basic build using just a coin cell, an LED, and copper tape typically takes a beginner 30 to 60 minutes start to finish, which lines up well with a single class period or a rainy Saturday afternoon, according to the Exploratorium’s tinkering blog. For a classroom, pre-cut the copper tape into manageable strips ahead of time. Kids under 8 struggle to cut tape cleanly with scissors, and jagged edges cause more short circuits than any other single mistake.
Battery disposal deserves a mention before you start. CR2032 cells are small enough to pose a choking and swallowing hazard for younger siblings, so store spares in a container with a locking lid, not a loose baggie on the craft table.
How Do You Build a Basic Paper Circuit Step by Step?
This is the core skill. Once a child can wire one LED to one battery reliably, every other project in this guide is just a variation on the same idea.
-
Sketch your circuit path in pencil first. Draw two lines on the cardstock that run from where the battery will sit to where the LED will go. Keep the two lines parallel and never let them touch or cross, because that’s the number one cause of a dead circuit.
-
Lay the copper tape along your pencil lines. Press firmly and smoothly, working in one direction to avoid air bubbles. At any corner, fold the tape back on itself so the shiny copper side stays face up and in contact, rather than just turning the tape flat, which can break the conductive path, according to SparkFun’s tutorial.
-
Identify LED polarity before you attach anything. Look closely at the two wire legs coming off the bulb. The longer leg is positive; the shorter leg is negative, according to BC Hydro’s paper circuit activity guide. Bend the legs flat so each one lies along a separate copper trace, long leg toward the positive trace and short leg toward the negative trace.
-
Tape the LED legs down. A small strip of clear tape over each leg, pressed onto the copper trace, holds it in place and improves contact. Some kids like to poke the LED bulb through a small hole in the cardstock so it pokes out the front of the card while the legs and wiring stay hidden on the back.
-
Build a battery holder. The simplest version: fold a small tab of cardstock, run one copper trace onto the top of the fold and the other onto the bottom, then slide the coin cell between them so one flat face touches each trace. A binder clip works even better for younger kids because it applies constant pressure and won’t slip loose mid-session.
-
Slide the battery in and check for light. If nothing happens, don’t panic. Flip the battery over. Coin cells have a plus side and a minus side, and getting it backward is the single most common reason a first attempt doesn’t light up, according to Science Buddies’ paper circuit instructions.
-
Tidy up before calling it finished. Trim any copper tape hanging off the edge of the card, smooth down loose corners, and confirm the LED sits where you want it visible from the front.
Budget your time like this: 10 minutes for planning and tracing, 15 minutes for taping, 10 minutes for the LED and battery holder, and the rest for troubleshooting and decorating. A first-timer usually needs the full hour; a child on their second or third circuit can finish in under 20 minutes.
Why Won’t My Paper Circuit Light Up?
Almost every dead paper circuit traces back to one of four causes, and all four take under a minute to check.
Battery orientation is wrong. This causes more “broken” circuits than anything else. Simply flip the coin cell over and try again before doing anything more complicated, a test Science Buddies recommends as the first troubleshooting step for exactly this reason.
LED polarity is backward. If flipping the battery doesn’t fix it, check that the longer LED leg touches the same trace that connects to the battery’s positive side. LEDs only conduct current in one direction, unlike most other components kids have encountered.
The tape isn’t making real metal-to-metal contact. This is especially common at folded corners or where two strips of tape overlap. Most copper tape adhesive is not conductive, so overlapping two pieces sticky-side to sticky-side can quietly break the circuit even though it looks connected. Fold the tape so the copper faces touch directly, or press hard enough at joints to guarantee contact.
A short circuit is bridging the positive and negative traces. This happens when the two copper lines touch somewhere they shouldn’t, letting current skip past the LED entirely. The fix is to peel up and re-lay the offending section with a wider gap, or lay a small strip of clear tape between the traces as insulation where they run close together, according to BC Hydro’s troubleshooting notes.
For projects with more than one LED, wire them in parallel rather than in series. Parallel means each LED gets its own dedicated pair of traces branching off the main circuit, so if one bulb fails or is wired backward, the rest still light up. Series wiring, where LEDs chain one after another along a single path, means one bad connection kills the whole string, and that’s a frustrating lesson to learn mid-project.
Keep a small troubleshooting kit on hand: spare batteries, extra copper tape, and a couple of binder clips. Nine times out of ten, one of those three items solves the problem.
What Are Good Paper Circuit Project Ideas for Kids?
Once the single-LED build clicks, the fun part starts. The recommended progression moves from a simple circuit to a parallel circuit to a creative applied project, a sequence that mirrors how STEM on a Dime structures its classroom lessons and gives kids a real sense of leveling up rather than repeating the same task three times.
Starter projects for younger kids or first attempts:
- A light-up greeting card with one LED glowing behind a cutout window, like a sun or a heart
- A simple paper creature with two LEDs as glowing eyes, cut from folded cardstock
- A “glowing sprinkle” jar drawing where an LED sits behind translucent paper to mimic a lit-up night sky
Intermediate projects once basic wiring is solid:
- A parallel LED array lighting up an entire scene, like five windows in a paper house
- A pressure switch made from two small squares of aluminum foil, taped a hair’s width apart, that touch when pressed and complete the circuit, letting kids build an interactive “push to light” button
- A pop-up circuit card where lifting a paper flap pulls a hidden trace into contact, lighting an LED as a surprise reveal
Pairing the build with a story prompt turns a wiring exercise into a creative project. Ask a child to design a scene first, a spaceship, a haunted house, a jungle at night, and then figure out where the light needs to go before touching any copper tape. This STEAM-style pairing of art and circuitry keeps the electronics meaningful rather than abstract, a point the Exploratorium’s tinkering team emphasizes in its own workshops.
For classroom scale, group kids in pairs of two so one traces while the other tapes, then swap roles for the second circuit. Printable templates with pre-drawn trace paths speed things up for groups of 15 or more, since you can pre-plan the layout and skip the freeform sketching step entirely. If your students already enjoyed a hands-on paper activity like paper airplane science, this progression fits the same classroom rhythm: quick demo, guided first attempt, then open creative time.
How Do You Facilitate a Paper Circuit Session Safely?
For a 30 to 60 minute session, plan roughly 10 minutes of demonstration, 30 to 40 minutes of hands-on building, and 10 minutes for sharing finished projects. Groups of 2 to 4 kids per adult helper work best for ages 5 to 8; kids 9 and up can often work solo or in pairs with less supervision.

Differentiate by age without changing the core lesson. For younger children, pre-cut the copper tape into straight strips and pre-draw the trace path on the cardstock so they only have to place and press. For older kids, hand them a blank card and let them plan their own layout, including where the battery holder goes and how to route traces around a drawing.
A few questions check real understanding rather than just successful copying:
- “What happens to the current if you flip the battery around?”
- “Why do the two copper traces need to stay separate the whole way?”
- “What do we call it when the LED doesn’t light because the traces touched each other?”
Pro Tip: Ask kids to predict whether their circuit will work before they slide the battery in. Predicting first, even wrong, builds far more understanding than watching it light up passively.
Safety essentials worth repeating out loud before kids start: coin cell batteries are a swallowing hazard for younger siblings, so batteries never leave the workspace unattended. Scissors and battery edges are the main pinch points for cuts. When the session ends, collect dead or unused batteries in a labeled container rather than a trash bin, since button cells should go to a battery recycling drop-off point, not landfill.
Which Batteries Work Best, and What Should You Watch For?
The CR2032 is the standard choice for paper circuits: a 3-volt lithium coin cell, wide enough to hold steady in a folded paper holder, and strong enough to power one or two LEDs comfortably. It’s also the same battery used in car key fobs and many watches, so hardware stores and pharmacies stock it cheaply in multi-packs.
Smaller coin cells like the CR2016 or CR1220 exist but deliver less current and drain faster under an LED load, so they’re a poor substitute for a beginner project where reliability matters more than size. Avoid rechargeable button batteries for kids’ projects; they’re pricier and offer no real advantage for a single afternoon build.
The main safety issue with any coin cell is accidental ingestion. Kids under 6 are the highest risk group, since a swallowed button battery can cause serious injury if it lodges in the esophagus. Keep spares in a sealed container, count batteries in and out during a classroom session, and never let unused cells sit loose on a shared table. Standard AA or AAA batteries, by comparison, are far less of a swallowing risk due to their size, but they’re also too bulky and low-voltage-per-size for a flat paper circuit design, which is why the hobby has settled almost universally on the coin cell format.
Can You Add Switches or Sensors to a Paper Circuit?
Once a single-LED build feels easy, adding a switch turns a static light into an interactive project, and it’s simpler than it sounds. A basic switch is just a deliberate gap in the circuit that only closes when you want the light on.
The easiest version for kids is a foil pressure switch: two small squares of aluminum foil taped to opposite sides of a folded paper flap, positioned so they touch only when the flap is pressed down or folded closed. Wire each foil square into one of your copper traces, and pressing the flap completes the circuit exactly like a real push-button switch.
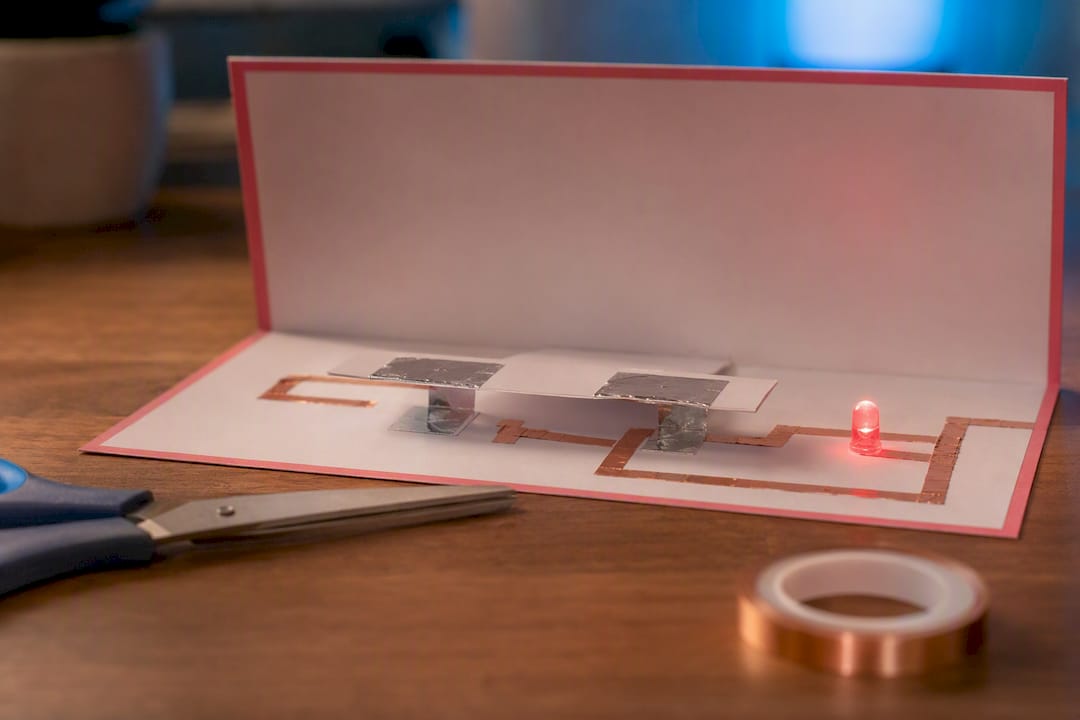
A pull-tab switch works similarly. Run one copper trace onto a paper tab that slides between the card and a second contact point; pulling the tab into place bridges the gap and lights the LED. This is a natural fit for pop-up cards, where lifting a flap “reveals” a light as a surprise.
For something closer to a real sensor, a tilt switch uses a small loop of foil or a paperclip that only makes contact when the card is tilted a certain direction, useful for a “shake to light” project. These builds all rely on the same underlying idea kids already learned: an open circuit doesn’t conduct, a closed one does, and a switch is just a controlled way to open and close that gap on demand.
Where Can You Find Templates and Deeper Tutorials?
For hands-on visual guides, Science Buddies’ paper circuit walkthrough and SparkFun’s full paper circuits guide cover templates and troubleshooting in more depth. For material sourcing beyond copper tape, Trinity Education’s notebook and activity supplies are worth a look for printable journals to pair with your build.
Why Comics and Circuits Belong on the Same Table
Brainie Comics built its whole model around one idea: a reluctant reader who won’t touch a science textbook will absolutely read a comic if the story is good enough, and then they’ll want to try the experiment on the last page. Paper circuits fit that model almost perfectly, because the wiring itself is a story problem, not just a task. Where does the current go, and why?
Pair Gravity Gang with any project involving physical mechanisms, like a pop-up card or a pressure switch, since the comic’s physics focus lines up naturally with how a switch or a fold-on battery holder works. Pair Fizz Force with anything involving materials and reactions, since its chemistry angle complements conversations about conductive adhesive and why some tape works better than others.
A simple classroom move: read one short panel together, then hand out the circuit materials and ask kids to build something inspired by what just happened in the story. It takes two minutes and changes the entire framing of the activity from “assignment” to “part of the story.”
The Real Lesson Isn’t the Circuit, It’s the Debugging
Most guides to paper circuits treat troubleshooting as an afterthought, a short list bolted onto the end after the “real” content. That’s backwards. The debugging moment, flipping the battery, checking a fold, finding the short, is where the actual learning happens. A kid who wires a perfect circuit on the first try learns almost nothing about how electricity works. A kid who has to figure out why their LED won’t light learns quite a bit.
The conventional advice pushes kits and pre-cut templates as the fast path to success. Templates have their place for large groups on a tight clock, but if you have the time, let a child sketch their own trace path and get it wrong once. That single failed attempt, corrected through one of four simple checks, teaches more about circuits than three perfect builds in a row.
Prioritize the story context first, the wiring second. A card that lights up because it matters to the story a child just read sticks in memory far longer than a light for light’s sake.
— Brainie Comics
Sources
- Beyond the museum: tinkering with paper circuits (Exploratorium blog)
- The great big guide to paper circuits (SparkFun)
- Make a paper circuit (Science Buddies)
- Introduction to paper circuits (STEM on a Dime / extension resource)