

Parents & Teachers: Get 2.5–3.0V From Lemon Batteries, Safely
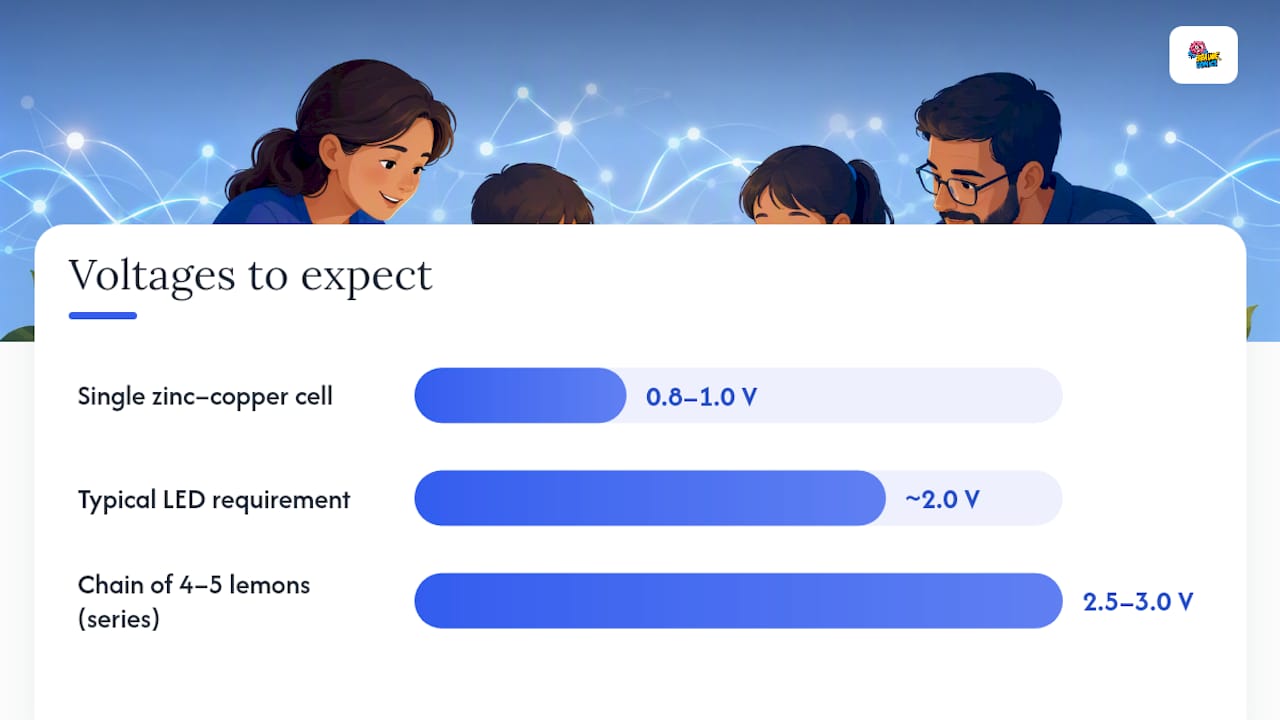
Yes, a lemon battery works, but a single lemon produces under 1 volt, nowhere near enough to charge a phone or run much else. Wire four or five lemons in series and you’ll usually get 2.5 to 3.0 volts, enough to glow a small LED like this one. You’ll need copper and zinc electrodes, wire, and ideally a multimeter to check your progress. Keep an adult on knife duty and treat the acidic juice with the same care as any citrus splash near the eyes.
TL;DR:
- A lemon battery typically produces less than 1 volt, so multiple lemons in series are needed to reach the voltage needed to light an LED.
- Four or five lemons wired in series often provide about 2.5 to 3.0 volts, but the current remains too low to charge a phone or power high-demand devices.
- Proper electrode preparation, clean metal surfaces, and correct series wiring are essential for consistent and effective results.
- Changing variables such as fruit type, electrode material, or electrode spacing generally has minimal impact on voltage but can influence the experiment’s outcome.
- Troubleshooting focuses on polarity, electrode condition, and metallic conductivity to improve LED brightness within the low current limits.
Table of Contents
- Lemon Battery Science Project Materials You’ll Need
- Getting Lemons and Electrodes Ready for the Circuit
- How to Make a Lemon Battery Step by Step
- Safety Rules and Cleanup for the Lemon Battery Experiment
- The Science Behind How a Lemon Battery Works
- Fun Fruit Battery Experiments and Science Fair Ideas
- Troubleshooting a Dim or Dead Lemon Battery
- Teaching Science Literacy Through Hands-On Experiments
- What Actually Works When You Run This With Kids
- Keep the Momentum Going With Story-Driven Science Kits
- Sources
Lemon Battery Science Project Materials You’ll Need
Before cutting into anything, lay out every piece so kids can see the whole circuit coming together. The core electrochemistry needs three things: two different metals and an acid to react with them.
- 4 to 5 fresh lemons (firmer lemons hold electrodes better than soft, overripe ones)
- Zinc strips or galvanized nails (one per lemon, this is your negative electrode)
- Copper strips or copper wire (one per lemon, this is your positive electrode)
- Insulated wire with alligator clips, enough to chain each lemon to the next
- A small LED, ideally a low-voltage red or yellow one that lights around 1.8 to 2.2 volts
- A digital multimeter (not required, but it turns guesswork into data)
Skip modern pennies if you can. Copper content in circulated pennies has dropped so far that they barely conduct compared to a real copper strip or bare copper wire, and results turn inconsistent fast. Pre-1982 pennies still have enough copper to work reasonably well, but a hardware-store copper strip is the most reliable choice for a classroom set. Avoid galvanized screws with painted or coated surfaces. The coating blocks the reaction entirely, so bare metal matters more than shape.
Getting Lemons and Electrodes Ready for the Circuit
A little prep work prevents most of the frustration kids run into mid-experiment.
- Roll each lemon firmly on the table for about 30 seconds to break up the internal pulp and release more juice without cutting the peel.
- Make two small slits in each lemon about an inch apart, deep enough to hold an electrode but not so close that the metals touch inside.
- Wipe copper and zinc electrodes clean with a paper towel. Dull or oxidized metal slows the reaction, so a quick polish helps.
- Insert one zinc piece and one copper piece into each lemon, pushing them in without letting them meet.
- If a multimeter is on hand, touch the probes to one lemon’s electrodes now. A reading between 0.7 and 1.0 volts confirms that cell is ready before it joins the chain.
Set up on a tray or a few paper towels, since juice will seep out as electrodes go in. Keep a damp cloth nearby for sticky fingers and countertops.
How to Make a Lemon Battery Step by Step
This is the part where the science becomes visible, so slow down here and let kids predict what will happen before each connection.
Build one lemon cell first
Insert a zinc strip and a copper strip into a single prepped lemon, spaced about an inch apart with neither touching the other inside the fruit. That’s a complete electrochemical cell already. The zinc is your negative terminal, the copper is your positive terminal, and the lemon juice between them is the electrolyte carrying the charge.
Touch a multimeter’s red probe to the copper and the black probe to the zinc, and you should see roughly 0.8 to 1.0 volts. Some inexpensive meters undersell the current, showing a flat 0.0 on the current setting even when a real, if tiny, flow is present. That’s a meter limitation, not a failed experiment.
One lemon typically produces less than 1 volt. A standard LED needs somewhere around 2 volts just to light up, which is exactly why one lemon on its own almost never works and why the series connection matters so much.
Chain lemons together in series
Series wiring means connecting the copper (positive) electrode of one lemon to the zinc (negative) electrode of the next, over and over down the line. Each lemon adds its voltage to the last one, so four lemons in series should land you around 3.2 to 4.0 volts in theory, though real-world contact resistance and juice variation usually bring the working total closer to 2.5 to 3.0 volts across four or five lemons.
Here’s the wiring order that trips kids up the most:
- Leave the very first lemon’s zinc electrode and the very last lemon’s copper electrode unconnected. These are your two open ends.
- Connect lemon one’s copper to lemon two’s zinc with a wire and alligator clip.
- Connect lemon two’s copper to lemon three’s zinc.
- Repeat down the chain until every lemon links to its neighbor.
- Measure across the two open ends with your multimeter set to DC volts. You’re looking for a combined reading in that 2.5 to 3.0 volt range.
If the number looks low, don’t panic yet. Loose clip contact is the most common culprit, and it’s an easy fix covered in the troubleshooting section below.
Connect and test the LED
LEDs only work one direction, so polarity matters here more than anywhere else in the build. The longer lead is the positive anode; connect it to your chain’s open copper end. The shorter lead is the cathode; connect it to the open zinc end. Get this backward and the LED simply won’t light, even with a strong voltage reading.
Dim the room lights before you flip the connection. A lemon-powered LED glows faintly, not like a flashlight, and bright overhead lighting can hide a working circuit and make kids think the experiment failed.
Pro Tip: Before wiring the LED into your lemon chain, test it briefly against a coin cell or low-voltage source. Connecting an LED straight to a stronger battery can burn it out instantly, and you don’t want a dead bulb to be mistaken for a wiring mistake.
Why this won’t charge a phone
A phone charger needs around 5 volts at roughly 1,000 milliamps of current. A lemon battery chain might hit 3 volts, but the current it delivers sits in the milliampere range, often just fractions of a milliamp per cell. Voltage measures the push; current measures the flow, and lemons simply can’t produce enough flow to move meaningful power into a device. It’s a fantastic way to light a single LED and a hopeless way to charge anything with a screen.
Safety Rules and Cleanup for the Lemon Battery Experiment
Nothing here is dangerous in the way a stovetop reaction might be, but a few habits keep the activity smooth.
- An adult handles all cutting and any inserting of sharp electrodes into the lemon.
- Small amounts of hydrogen gas can form at the zinc electrode during the reaction, so keep the workspace away from open flames or lit candles.
- Wash hands after handling lemons and electrodes; citric acid stings in small cuts and can irritate eyes if rubbed in.
- Recycle metal electrodes for reuse and discard spent lemons in compost or regular trash, not down a sink drain where pulp can clog pipes.
Pro Tip: Keep a bowl of water and a paper towel roll at the table before you start. Acidic juice on hands is harmless but uncomfortable, and having cleanup ready means kids won’t lose focus mid-experiment to go find a sink.
The Science Behind How a Lemon Battery Works
Here’s the part that surprises most kids and more than a few adults: the lemon isn’t actually the power source. The energy comes from the metals themselves, specifically from zinc’s chemical eagerness to give up electrons. The lemon juice is just the electrolyte, the liquid medium that lets charged particles move between the two metals so the reaction can happen at all.
This is a redox reaction, chemistry shorthand for “reduction and oxidation happening together.” The zinc electrode oxidizes, meaning zinc atoms lose electrons and dissolve slightly into the juice as zinc ions. Those freed electrons don’t have anywhere to go inside the lemon, so they travel out through the wire instead, which is the electric current you’re measuring. At the copper electrode, hydrogen ions from the citric acid grab those electrons in a reduction reaction, and the whole cycle is what drives electron flow through your circuit.
This explains something that trips a lot of students up: swapping lemons for limes or oranges barely changes the voltage, because the acid’s main job is conducting, not generating power. The metal pairing is what sets the voltage ceiling. Swap zinc and copper for two identical metals and you get close to nothing, because there’s no difference in electron “eagerness” to drive a flow.
Series versus parallel wiring is one of the clearest hands-on lessons in the whole activity:
- Series wiring (positive to negative, chained end to end) adds each cell’s voltage together. This is what you need to reach the roughly 2 volts an LED requires.
- Parallel wiring (all positives joined together, all negatives joined together) keeps voltage close to a single cell’s reading but increases the total current available. It’s the better setup for demonstrating current, not for lighting an LED.
The typical numbers worth writing on a whiteboard: each zinc-copper cell reads about 0.8 to 1.0 volts, a chain of four or five lemons lands around 2.5 to 3.0 volts total, and current output across the whole setup stays in the low milliampere range. Those numbers are small enough that a lemon battery will never run a motor or a speaker, but they’re exactly the range a basic LED needs.
Fun Fruit Battery Experiments and Science Fair Ideas
Once the basic lemon battery experiment works, the real learning starts with controlled comparisons. Change one variable at a time and record what shifts.
- Fruit swap test: Build identical setups with a lemon, a potato, and an apple, keeping electrode type and spacing constant, then compare voltage readings across all three.
- Electrode swap test: Try magnesium ribbon in place of zinc. A magnesium-copper pair can push a single cell closer to 1.5 to 1.6 volts, noticeably higher than zinc, though magnesium needs adult handling since it reacts more vigorously.
- Spacing test: Move the two electrodes closer together, then farther apart, in the same lemon and note whether voltage changes (it typically won’t much, since voltage depends on the metals, not the gap).
- Series vs parallel data table: Wire three lemons in series, record the voltage, then rewire the same three in parallel and record voltage and current side by side.
For a science fair board, frame a real hypothesis before touching a single lemon, something like “increasing the number of lemons in series will increase total voltage in a linear pattern.” Then build a data table with columns for lemon count, predicted voltage, and measured voltage, and let the multimeter readings do the talking.
Troubleshooting a Dim or Dead Lemon Battery
When the LED refuses to light, work through this order rather than rebuilding the whole thing from scratch.
- Check LED polarity first. The longer lead is positive. This single mistake accounts for more “failed” experiments than any wiring error.
- Test each lemon individually with a multimeter. A weak or old lemon reading well under 0.7 volts should get swapped out or re-inserted with fresher electrode placement.
- Swap out pennies for copper strips. Modern pennies carry too little copper to conduct reliably, and this alone fixes a surprising number of dim setups.
- Add more lemons in series if voltage is low, or wire in parallel if you want to test current instead. Remember: series boosts voltage, parallel boosts current, and they solve different problems.
Pro Tip: If your multimeter shows exactly 0.0 on the current setting, don’t assume the circuit is dead. Cheaper meters often can’t register currents below 1 milliamp, which is right where a lemon battery sits. Trust the voltage reading over the current reading on a budget meter.
Teaching Science Literacy Through Hands-On Experiments
A lemon battery does more than light a bulb. It teaches kids to predict an outcome, test it, and revise their thinking when the data doesn’t match the guess, which is the actual skill behind every real scientific method, not just the vocabulary of one. For ages 7 to 12, this experiment works because the feedback is immediate: the LED lights or it doesn’t, and troubleshooting becomes its own lesson in patience and precision.
A few scaffolds make group work run smoother:
- Assign roles: one student cuts and preps (with adult help), one wires the circuit, one runs the multimeter and records numbers.
- Use a simple data table with columns for lemon number, voltage reading, and notes on electrode condition.
- Ask guided questions mid-activity, like “why do you think the voltage dropped after we added that lemon?” instead of just handing kids the answer.
Brainie Comics builds this same story-first, hands-on structure into Fizz Force, where kitchen chemistry experiments are woven into an actual narrative kids want to keep reading. For more electricity-focused activities to run alongside this one, static electricity experiments make a natural pairing lesson on charge and current.
What Actually Works When You Run This With Kids
Set aside 30 to 40 minutes, not 15. Most of that time goes to prepping lemons and electrodes, not the wiring itself, and rushing prep is where sloppy results creep in. Groups of three work better than pairs. One kid always wants to hold the multimeter, so build that into the role assignments instead of fighting over it.
The biggest confusion point is almost always polarity, both on the LED and on the series chain. Turn that confusion into the lesson rather than just correcting it: ask kids to predict which way current should flow before they test it. A quick check for understanding at the end: ask them to explain, in their own words, why the lemon isn’t actually the source of the electricity. If they can answer that, the lesson landed.
— Brainie Comics
Keep the Momentum Going With Story-Driven Science Kits
Running one great experiment often leaves kids asking “what’s next?” That’s the gap Brainie Comics fills for parents and teachers who don’t have hours to plan a follow-up lesson. 
Fizz Force wraps chemistry concepts like the redox reaction behind this lemon battery into an ongoing comic story, so kids read a chapter and then run a kitchen-safe experiment tied directly to what they just read, no separate lesson plan required. Gravity Gang does the same for physics concepts like circuits and force, which pairs naturally with the electron-flow ideas covered here. These books include materials lists built into the story, reducing the time spent searching for prep materials. If your lemon battery experiment left kids wanting the next hands-on chapter, browse the full lineup at Brainie Comics and pick the title that matches whichever subject sparked the most questions today.

Sources
For deeper detail beyond this guide, these sources cover the chemistry, measurement, and classroom application in more depth:
- How to make a lemon battery | ANU College of Science
- Lemon battery experiment | Science Notes
- Lemon battery — Wikipedia