

Density Tower Experiment: A Step-by-Step Guide for Kids
A density tower is a jar of stacked liquids that separate by weight instead of mixing, with honey and syrup sinking to the bottom and rubbing alcohol floating on top. The fastest path to one: grab a clear jar, pick 4 to 6 kitchen liquids with different densities, and pour them in slowly from densest to least dense, waiting between each one.
- Kit: tall clear jar or glass, honey, corn syrup, dish soap, water, vegetable oil, rubbing alcohol, dropper or spoon, food coloring (optional)
- Process: pour the densest liquid first, then add each next layer slowly down the side of the jar, waiting a few seconds between pours
- Safety: an adult should supervise pouring and handle rubbing alcohol; kids under 8 should not pour alone
According to reference data compiled by the University of Michigan Museum of Natural History, honey measures about 1.42 grams per milliliter compared to water’s 1.00, which is why it anchors the bottom of nearly every tower.
Key Takeaways
A density tower works because liquids with different mass per volume settle into stacked layers, with the densest liquid always at the bottom.
| Point | Details |
|---|---|
| Core science | Density equals mass divided by volume, and denser liquids always sink below lighter ones. |
| Pour order matters | Start with honey or corn syrup and finish with rubbing alcohol, pouring slowly down the jar wall. |
| Patience prevents mixing | Wait 30 to 60 seconds between layers and let disturbed layers settle instead of stirring. |
| Extend with objects and salt | Test small objects for buoyancy or add salt to water to change its density for a new comparison. |
| Pair with a story | Brainie Comics’ Fizz Force ties this same density concept into a chemistry adventure with more kitchen experiments. |
Table of Contents
- Materials for a Liquid Density Tower
- How Do You Layer the Liquids in Order?
- Why Do the Liquids Separate Instead of Mixing?
- What Should You Do if the Layers Mix Together?
- How Can You Extend the Density Tower Activity?
- How Old Should Kids Be to Try This Safely?
- What Should Teachers Know Before Running This in Class?
- Why We Think Every Kid Should Build One of These
- Keep the Curiosity Going After the Jar Is Clean
- Frequently Asked Questions
- Sources
Materials for a Liquid Density Tower
You don’t need a science lab. You need a clean jar and whatever is already in your pantry.
These figures come from measurements gathered by the University of Michigan Museum of Natural History, and they hold up well as classroom estimates. No maple syrup on hand? Substitute it for corn syrup. Dish soap can swap in for milk if you want a cleaner, longer-lasting layer since milk spoils. A tall glass, a spoon, and a turkey baster round out your tools.
Pro Tip: Add a drop of food coloring to the water and the rubbing alcohol before pouring. Clear liquids like oil and alcohol are easy to mix up mid-pour, and color removes the guesswork.
How Do You Layer the Liquids in Order?
Building a clean density column comes down to patience more than precision. Rushing is the single biggest reason towers turn muddy.
- Set up your station. Line up small cups, one per liquid, and measure roughly equal amounts, about 1/4 cup each for a quart jar.
- Color the clear liquids. Add a drop of food coloring to water and rubbing alcohol so every layer is visible from the outside.
- Pour the honey first. Let it settle flat for a minute before moving on.
- Add corn syrup next. Tilt your jar slightly and pour down the inside wall rather than straight into the center.
- Pour the dish soap, then the colored water. Go slowly. A thin, steady stream beats a fast dump every time.
- Add the vegetable oil. Oil is lighter and less viscous, so pour it gently onto the surface rather than down the side.
- Finish with rubbing alcohol. This is the trickiest layer. Use a dropper or turkey baster and release it in small amounts near the jar’s edge.
- Wait 30 to 60 seconds between each layer so the liquid below has time to settle before the next one lands on it.
Beginner instructions from KiwiCo recommend this exact densest-to-lightest order, and it’s the sequence most home experiments follow. The trick that separates a messy jar from a magazine-worthy one is where you release each liquid. Aim for the inside wall of the jar, not the open center, so the stream loses speed before it reaches the layer below.
Pro Tip: For the top two layers especially, use a turkey baster and release the liquid in short bursts instead of one continuous stream. Slower always wins here.
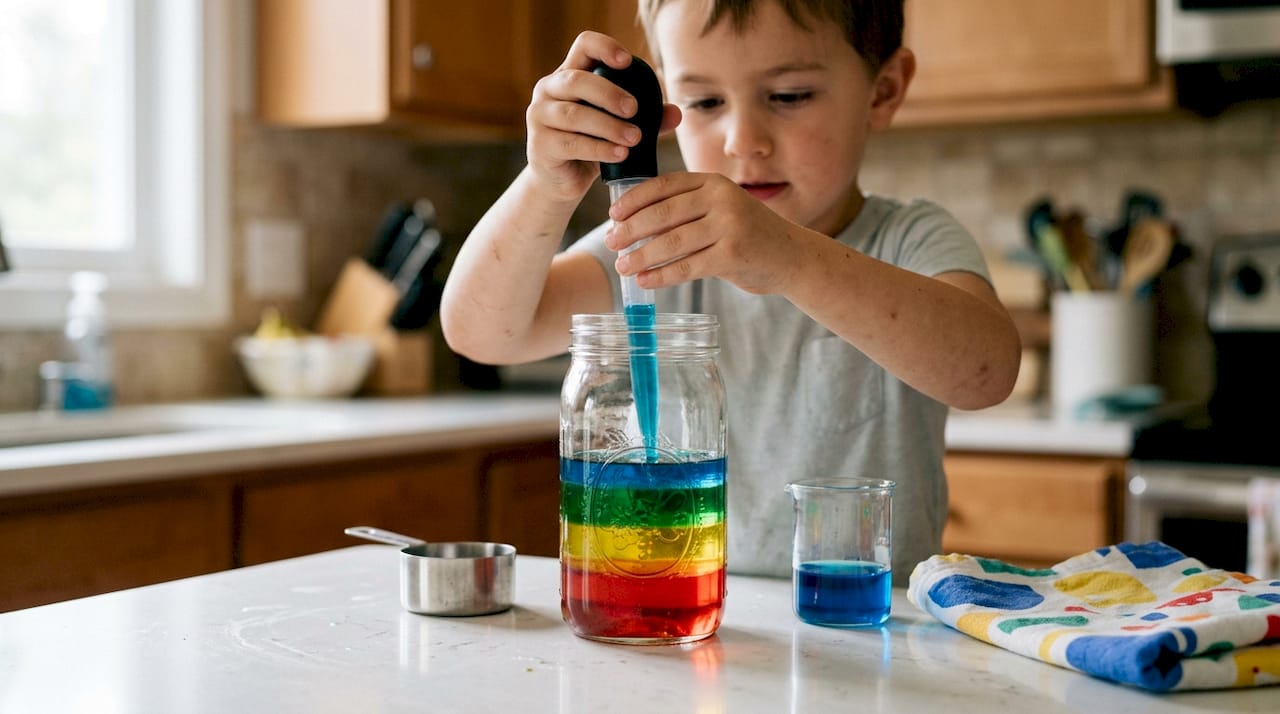
If you’re taking photos for a classroom display or a science fair board, shoot the pour at a slight downward angle so you can see both the tilted jar and the baster tip meeting the liquid surface.
Why Do the Liquids Separate Instead of Mixing?
Density = mass ÷ volume
That’s the whole idea packed into one line. A denser liquid packs more mass into the same amount of space, so it sinks below anything lighter.
- Honey feels heavy for its size because its molecules pack tightly together.
- Oil feels light for its size because its molecules spread out more.
- Gravity pulls the denser liquid down until it finds the bottom of the jar.
Some liquids also refuse to mix at all, a property called miscibility. Water and rubbing alcohol are both polar, so they’d blend if you shook them together, but oil is nonpolar and stays separate from water even after vigorous stirring. That’s the same reason oil spills float on ocean water instead of dissolving into it. Layering activities built around corn syrup, colored water, and vegetable oil consistently produce this predictable split, according to Science Buddies. Rubbing alcohol at roughly 0.79 grams per milliliter floats above water at 1.00, and honey at 1.42 sinks below both, based on measurements from LivePhysics.
What Should You Do if the Layers Mix Together?
Cloudy or blended layers are almost always a pouring problem, not a chemistry failure.
- Poured too fast? Slow down. A thin trickle down the jar wall beats a quick pour every time.
- Layers already mixing? Stop pouring and let the jar sit. Immiscible liquids like oil and water usually re-separate on their own within a few minutes.
- Corn syrup blended into water? That layer may be permanently mixed since the two are partially miscible, so you may need to start that layer over.
- Cloudy spots near an interface? That’s usually just tiny droplets suspended between layers, and it clears up as the jar settles.
Pro Tip: If a pour goes wrong, don’t stir to “fix” it. Walk away for 10 minutes and let gravity do the sorting.
How Can You Extend the Density Tower Activity?
Once the basic tower works, there’s plenty of room to push it further.
- Add maple syrup, glycerin, or lamp oil for extra layers, keeping in mind exact densities vary by brand.
- Stir salt or sugar into a cup of water before pouring to make a denser water layer, then compare it against plain water.
- Drop in small objects, a grape, a bottle cap, a steel bolt, and watch where each one stops.
- Turn it into a prediction game: have kids guess the order before pouring, then check their guesses against the real result.
- Start with the standard 6 layers listed above.
- Add 2 to 3 more (maple syrup, glycerin, dish soap variant) for a 7 to 9 layer challenge.
- Test objects one at a time, releasing them near the jar’s edge instead of the center.
A steel bolt sinks straight through every layer since metal is far denser than any kitchen liquid, while a piece of foam or a ping-pong ball floats on top, according to Science U. That contrast is what makes the buoyancy lesson click for kids who’ve never thought about why some things float and others don’t.
How Old Should Kids Be to Try This Safely?
Kids as young as 5 can watch and help color liquids, but pouring should stay adult-led until around age 8 or 9, when kids can handle a spoon or baster with supervision.
- Keep rubbing alcohol away from skin and eyes, and never let kids taste any layer.
- Work over a tray or newspaper since spills are common during the pouring stage.
- Clean up with warm soapy water and paper towels; pour leftover mixed liquids down the drain with running water.
- If you want to keep the tower as a display, seal the jar tightly. Oil and alcohol layers can evaporate or separate further over weeks, so treat it as a short-term display, not a permanent one.
What Should Teachers Know Before Running This in Class?
For a classroom, this activity fits neatly into a 45 to 60 minute period, with prep, pouring, and a wrap-up discussion.
Learning objectives: understand that density equals mass divided by volume, predict how liquids will stack based on density, and describe miscibility in plain language.
Formative assessment ideas: hand out a prediction chart before pouring and have students rank the liquids from heaviest to lightest. Follow up by weighing equal volumes of two liquids on a kitchen scale to show that the heavier one always sinks.
| Liquid | Approx. density (g/mL) |
|---|---|
| Honey | 1.42 |
| Corn syrup | 1.42 |
| Dish soap | 1.00 |
| Water | 1.00 |
| Vegetable oil | 0.79 |
| Rubbing alcohol | 0.79 |
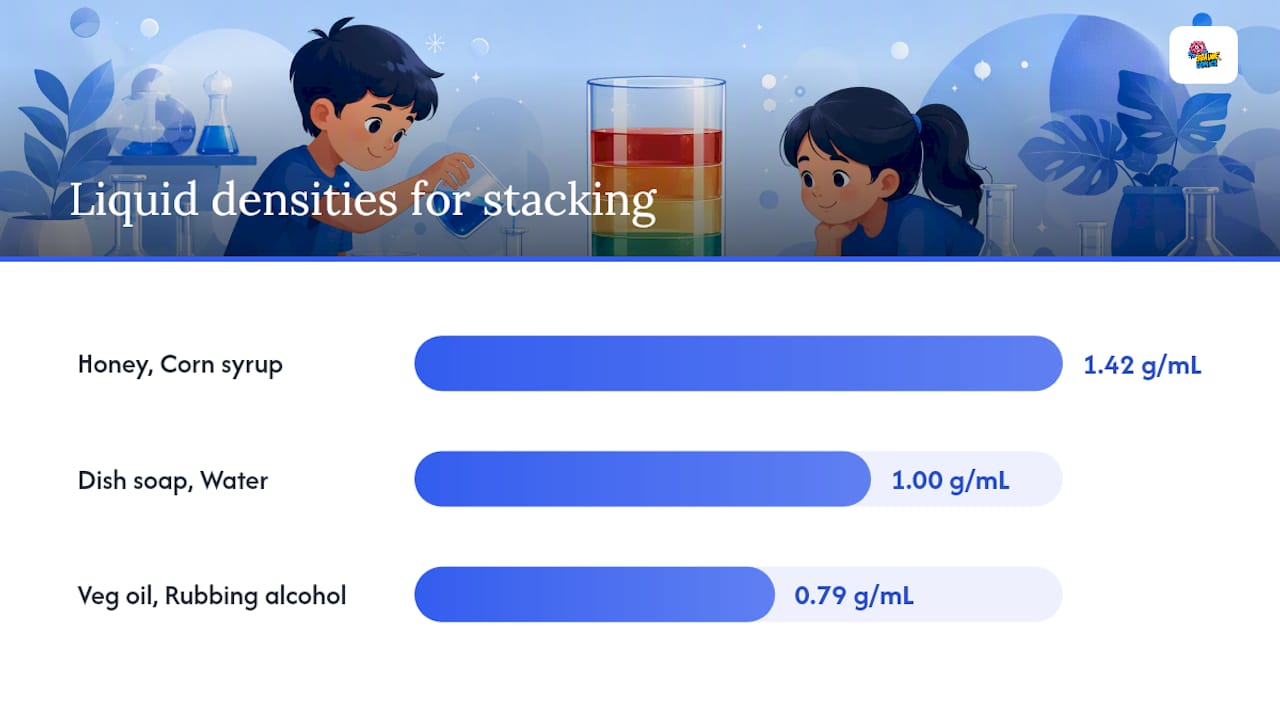
These approximate values, drawn from the University of Michigan Museum of Natural History and confirmed by LivePhysics, work well for lesson planning even though brand-to-brand variation exists. The activity ties naturally into density and matter units and works for grades 3 through 8 with adjusted vocabulary.
Why We Think Every Kid Should Build One of These
Kids remember what they build with their own hands far longer than what they read in a textbook, and a density tower turns an abstract number, mass divided by volume, into something they can literally see stacked in a jar. That’s the same instinct behind pairing every experiment in our comics with a story, because curiosity sticks when it’s wrapped in a plot kids actually want to finish.
Keep the Curiosity Going After the Jar Is Clean
Once the layers settle and the questions start (“why didn’t the oil sink?”), that’s exactly the moment a good story can carry the lesson further.

Fizz Force turns density, mixtures, and chemical reactions into a comic adventure with kitchen-safe experiments built right into the story, so the density tower becomes one chapter in a bigger science habit instead of a one-off afternoon. If physics and buoyancy hooked your kid more than chemistry did, Gravity Gang picks up that thread with its own hands-on tasks. Browse the full lineup at Brainie Comics and pick the title that matches what lit up your child’s curiosity today.
Frequently Asked Questions
What liquids work best for a density tower experiment? Honey, corn syrup, dish soap, water, vegetable oil, and rubbing alcohol give you six clear, distinct layers using only common kitchen items.
Why do my layers keep mixing together? You’re likely pouring too fast or aiming at the center of the jar. Slow your pour, aim for the inside wall, and wait between layers.
How long does a density tower last before it separates back out? Most kitchen liquid towers stay stable for days to a few weeks if sealed, though oil and alcohol layers can shift over time as they slowly evaporate.
Can you use juice or soda instead of the standard liquids? Yes. Juices with higher sugar content are denser than plain water, which makes them a fun substitute for teaching the same density gradient concept.
What age is appropriate for this experiment? Kids around 8 and up can pour with supervision, while younger kids can safely help measure and color liquids while an adult handles the pouring.
Sources
- UMMNH_DensityLayerTower.pdf
- Liquid stacking — Science Buddies
- Density Tower Lab - Chemistry Tool | LivePhysics